
Beginner Brush Lettering – The Basic Tools and Techniques
Articles may contain affiliate links.

Have you ever looked at the beautiful lettering eye candy that pops up on Instagram, Facebook, and Pinterest? There’s something so mesmerizing about watching the written word become a piece of graceful art. You may think that such a beautiful hobby is out of your reach, but that’s just not true! Beginner brush lettering is extremely easy to pick up and requires only two things: a brush pen and some practice. In no time at all, you can us a beginner’s guide to be cranking out breathtaking modern calligraphy. So let’s get started!
Materials
To learn brush lettering, you don’t need to buy a ton of fancy pens and inks in order to master beginner brush lettering techniques. One pen will do the trick! I have a number of favorite brush pens, but there are two in particular that I recommend for newbies: Tombow Dual Brush Pens and Faber-Castell PITT Artist Pens. Both of these have nylon tips that are solid, but flexible, giving you oodles of control. If you prefer something a little more fast and loose, I also really love my Pentel Pocket Brush pen. This brush pen has ridiculously rich black ink and looks stunning on the page.
If you have thicker paper, Pentel’s Aquash Water Brushes are an extremely versatile choice. You can use inks and watercolors and blend seamlessly. I currently have Noodler’s 54th Massachusetts in the barrel of my medium brush pens. Besides that, I use a Prang watercolor palette for those gorgeous colors.
I also use Faber-Castell’s Big Brush, which is excellent. You can really achieve some nice line variation with this bad boy. You obviously can’t go into fine detail, but this is great for medium to large work. The black ink is particularly rich on this pen, too.
By the way, I have used all of these pens (even the water brushes) in my Leuchtturm1917 and they’re all great. I use these in my bullet journal all the time!

The Motion
As you begin playing with beginner brush lettering a little bit, you may find that you tend to use your fingers to guide the pen. It’s the way most people write their day-to-day handwriting – they draw the letters onto smooth paper. Not sure if that’s you? Try writing anything on a scrap of paper and pay attention to what muscles move the pen. The proper way to write the letters is by using your arm and wrist instead of your fingers. The pen should be completely immobile in your hand.
To practice this motion, pretend that you are writing on a chalkboard in front of you. Trace the first letter, then the next letter, and so on in the air really big so you have no choice but to move your whole arm. This may feel silly, but it will prime the right muscles for brush lettering. You want to build up muscle memory so your arm knows the movements. After a bit of practice, you should be able to create nice calligraphy blindfolded. It might seem daunting now, but you’ll get there in no time! It’s like riding a bike – awkward at first, but soon enough your body will know exactly how to do it.
Subscribe to get access to 40+ pages of printables, brush lettering worksheets, and more!Enter the Fox Den Resource Library
The Grip
When you hold the pen in your hand, you may be tempted to hold it like you would a regular pen. This mostly vertical grip is not great for getting smooth consistent lines or a large variation. You are also more likely to wear out the muscles in your hand because you’ll be tempted to write with your fingers. As you can see in the picture below, you can still get decent results with thick and thin strokes. It’s just making the work harder than it has to be and slowing your muscle memory retention.

Hold the brush tip pen at a 45-degree angle and you’ll find that it’s much more smooth. You have access to the full length of the tip, meaning you can easily make fat or thin lines. Because it’s not the way you write with regular ballpoint pens, you will be less tempted to write with your fingers. You can see the better grip below.
The Trick
Here’s the trick that you absolutely need to know for brush lettering. In order to create the beautiful effect that is a staple in almost every single brush lettered font, you must have two basic strokes: a light upstroke and a heavy downstroke. In other words, apply light pressure on the pen every time you pull the pen up and apply heavier pressure every time it goes down. This one simple rule is exactly what I talked about in my last brush lettering post and it is the key to gorgeous beginner brush lettering.

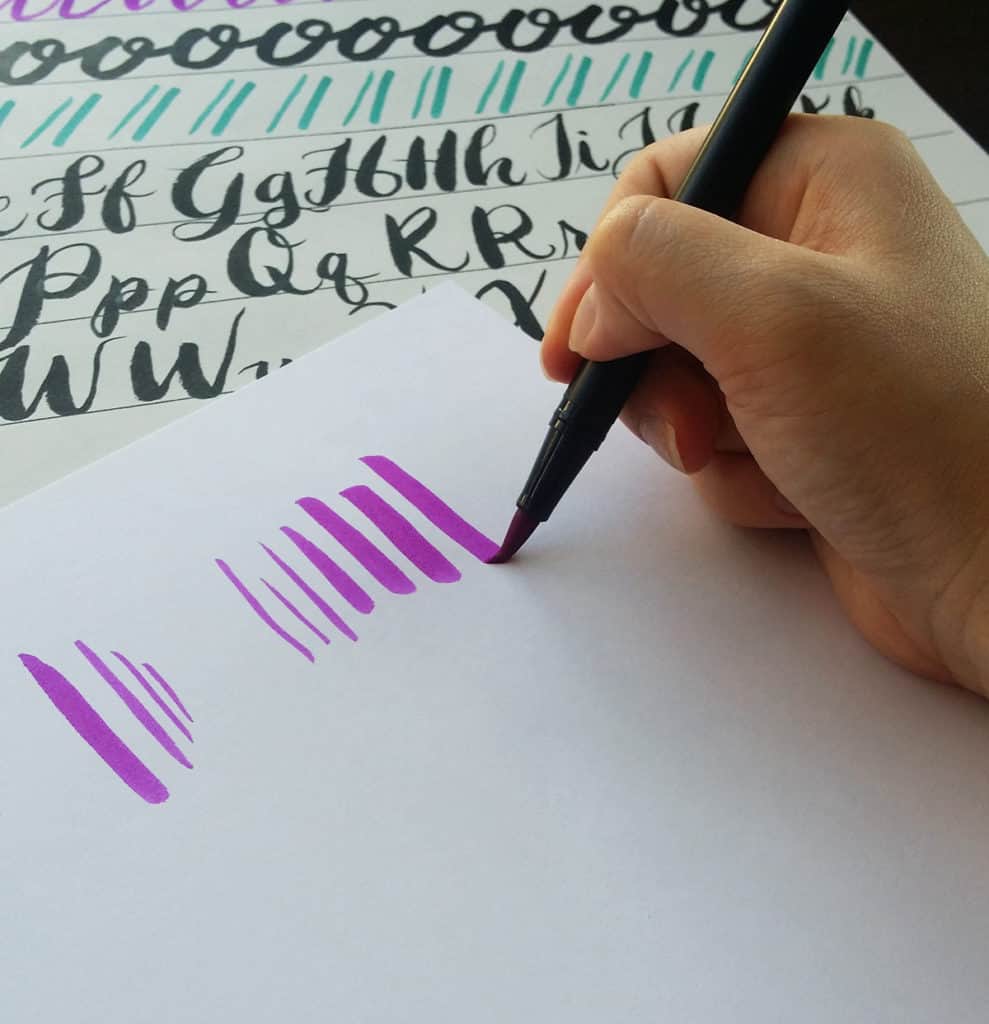
The Drills
Now comes the fun part! Like with any other skill, you have to practice practice practice before you become really good. You can do beginner brush lettering without a ton of practice, but you’ll want to do drills if you plan on keeping this hobby around. These are also great warm-ups before you jump into a project.
The drills themselves are very simple. You basically find one of the shapes that create a letter, such as the “L” loops on the top row. These shapes can be found in the lowercase alphabet letters like “e”, “f”, “d”, “h”, etc. The row below that has a motion found in “i”, “u”, “w”, “m”, and “n”. If you practice these shapes and master their form, you can create most of the alphabet. You are aiming for consistency in your drills. Over time, this will come as muscle memory sets in.
Brush Lettering is for You
Even if you tell yourself that you aren’t an artist or you can’t draw, don’t think for a second that you can’t pick this up. It will take a bit of work to get really good, but there’s no reason you can’t be awesome right now. This is such an accessible hobby, and it’s so much fun! I love how relaxing it is to sit down and write my favorite quote or letter something inspirational to put over my desk.
When people compliment me on my hand lettering, I always feel like a sneak because of how secretly easy it is! So if you’ve been envying other people and their fancy word art, show ’em by kicking some lettering butt. Download my free printable by clicking the image below and try tracing the letters to see how they feel. If you want to take it a step further and learn to letter like a pro, then check out my Brush Lettering 101 course! It’s the go-to resource to help beginners grab this hobby by the horns and grow exponentially. This course is quick, easy, and fun – making it perfect for a newbie lettering enthusiast.
I know that if you try this out, you’ll be impressing yourself and your friends in no time. All it takes is one brush pen!

Want free brush lettering worksheets? Look no further! Just head here or click the image below to sign up for the Fox Den Resource Library, where you will find lettering worksheets, planner printables, and more!


Hi, thanks for the tips, just one question, I wanted to buy a brush pen but I couldn’t find tombow dual pen in my arena instead I found some kinda pen that was refillable with ink like Pantel ones, but the tip of the pen is plastic and a bit longer than the ones I saw in tutorials and videos, should I buy it? Or it may cause problems?
Thanks
Hey Mohammad! That’s a tough one. I can’t say whether the pen will be any good or not unless I’ve tried it personally. If the pen is affordable, though, I would personally love to buy it just to experiment with it and see how it feels. I wish I could be more helpful in your decision! Good luck and happy lettering 🙂
The tip about not moving the fingers but the arm as a whole makes so much sense for calligraphy. I certainly went from 0/100 to 1/100 in my calligraphy just using that tip. It’s at least a start! Thank you for the article!
I’m so glad to hear that tip was so helpful for you Nitin! Keep at it 😉
Um, sorry for asking, but the free printable shown above isn’t available in the Fox Den Library. Could you please help me?
Hi Hikari,
So sorry about that! We have updated the post so you should now be able to click through to the free printable. Thank you for letting us know and we apologize for the trouble.
Thank you so much for your help. I NEVER thought I could do this. But with your practice sheets, and me practicing I’m actually managing to write beautiful. Thank you!
Oh that is SO wonderful to hear BrendaLea!
thank you
Very inspiring and doable
Thank you Anuradha! I hope that you enjoy learning brush lettering.
I really like the Tombow Dual TIps, but for beginners, my favorites are actually the Tombow Fudes, especially the Tombow fude soft.
I’m right there with you, Jadyn! The fudes are a lot smaller and feel a bit less intimidating, and they’ve quickly become my favorites for regular use! Tombow just can’t stop making good pens, can they? 🙂
The Pentel Aquash with the ink in it: how long do you leave the ink in? I read somewhere that the ink will clog it if you leave it longer than a one time use. If you leave it longer how do you store it (horizontal or vertical)?
PS: I love your blog!! Thank you for all your wonderful help and advice!
Thanks so much, Larissa! And that’s a great question. I’m sure it depends wildly on the type of ink you put in the barrel, but I had that blue ink in the barrel of one of my brushes for more than a month before I finally emptied it. I still use that water brush all the time today! Granted, I watered down the ink a bit, so it wasn’t pure ink. I would say watery inks that are fine for fountain pens will probably be okay, but if you aren’t ready to replace the brush, I wouldn’t leave it too long. I hope that helps!
This was super helpful! I love seeing all these amazing lettering styles and would love to be able to practise this myself, so thank you for sharing your tips and recommended tools 😀
VioletDaffodils
xx
I’m so glad you enjoyed it, Kate! I had a ton of fun putting it together. Have fun creating your beautiful lettering!