
A Complete Guide To Painting Watercolor Galaxies (2025)
Articles may contain affiliate links.

How to Paint A Watercolor Galaxy
This is a free sample from my course, Painting Watercolor Galaxies: How To Create Epic Celestial Scenes, on Foxsy.com.
Enter the Space Scene
Before we could peer through telescopes, mankind has always held a special fascination for the stars. Our universe holds wonders we can never imagine, and yet we can’t stop ourselves from looking upward and dreaming. It’s no wonder that artists all over the world and throughout time have tried to capture the essence of the stars.
In recent years, a new trend of painting watercolor galaxies has popped up online. You can find these ethereal and colorful paintings all over the web, and it’s enough to get you drooling.
You’ll be happy to know that creating a watercolor galaxy painting is much easier than it looks! In fact, I am going to walk you through a step-by-step tutorial to show you some simple techniques on how you can create your own spacey art easily.

New to Watercoloring?
If you're new to watercoloring, I highly recommend that you check out my watercolor guide for beginners. This massive free guide includes absolutely everything you need to get started watercoloring.
Even if you're not new to watercoloring, I guarantee you'll find some stuff you love.
Materials Needed to Paint a Watercolor Galaxy
Of course, you’ll need to gather your art supplies before you start painting! I used some of my nicer supplies, but you can absolutely create watercolor galaxies on a budget. Check out my full post on watercolor supplies to see a variety of options.
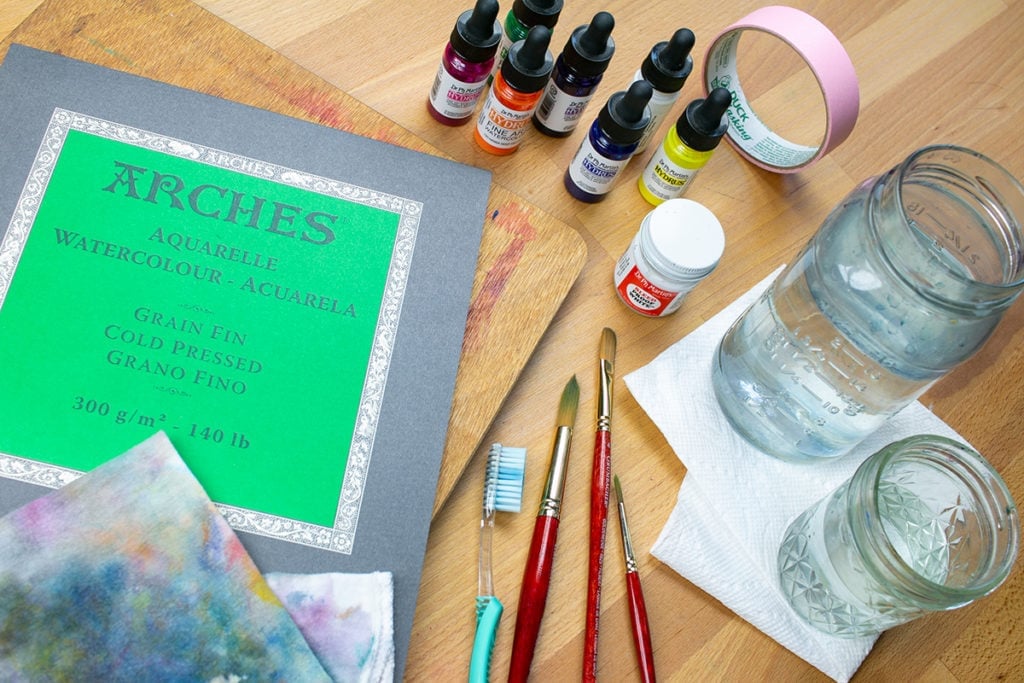
Arches Watercolor Paper
You’ll definitely want a decent quality watercolor paper since this is such a wet technique.
Dr. Ph. Martin’s Hydrus Liquid Watercolors
I find that liquid watercolor works best for watercolor galaxies, but any watercolor will do. Truthfully though, any supplies you have lying around will work; I’ve used pans and tubes of watercolor paint without problem.
Dr. Ph. Martin’s Bleedproof White
If you don’t have white watercolor paint, this is an excellent option. It’s also wonderful for brush lettering!
Grumbacher paintbrushes
I’m using round no 0 and 14 in this painting.
Toothbrush
Be environmental and get a bamboo toothbrush, or just hold on to one for a long time. I’ve had my old toothbrush going on 10 years!
Masking Tape
Heat Tool
Watercolor Board
Anything sturdy and flat will work. You just want to keep your painting taped to the board and off of your work surface. I’m using a large wooden paint palette.
Cleaning Rag
Paper Towels
Two Jars of Water
What Colors Do You Need to Make a Galaxy Painting?
As you gather your materials, you might get stuck on your watercolor paints. What colors make for a good galaxy? Truly, there is no right or wrong answer. This is art, after all, and everything is up to you on how to make it your own. However, if you’re wanting a good jumping-off point, I can offer some of my favorite colors for watercolor galaxies. When I’m creating a galaxy painting, I love dialing it up with bold, vibrant colors. Sometimes I’ll reach for nearly neon levels of brightness, and other times I’ll lean into bold jewel tones.
And while you certainly can stick to just one or two colors in your galaxy, there’s nothing stopping you from making your galaxy pop with several different beautiful colors. In this tutorial, I’m only using three jewel-toned colors (not counting black and white). I use a deep marigold yellow, a rose red, and a dark ultramarine blue.
For a more vibrant galaxy, consider incorporating shades of purple, indigo, or dark blue into your color palette. You can also add shades of oranges to your color palette for a warm and vibrant galaxy. As you are creating watercolor galaxies, try a few different color combos to see what fits your style best!
How to Paint a Watercolor Galaxy
Once you have your supplies ready to go, then you can begin the process of creating your own watercolor galaxy!
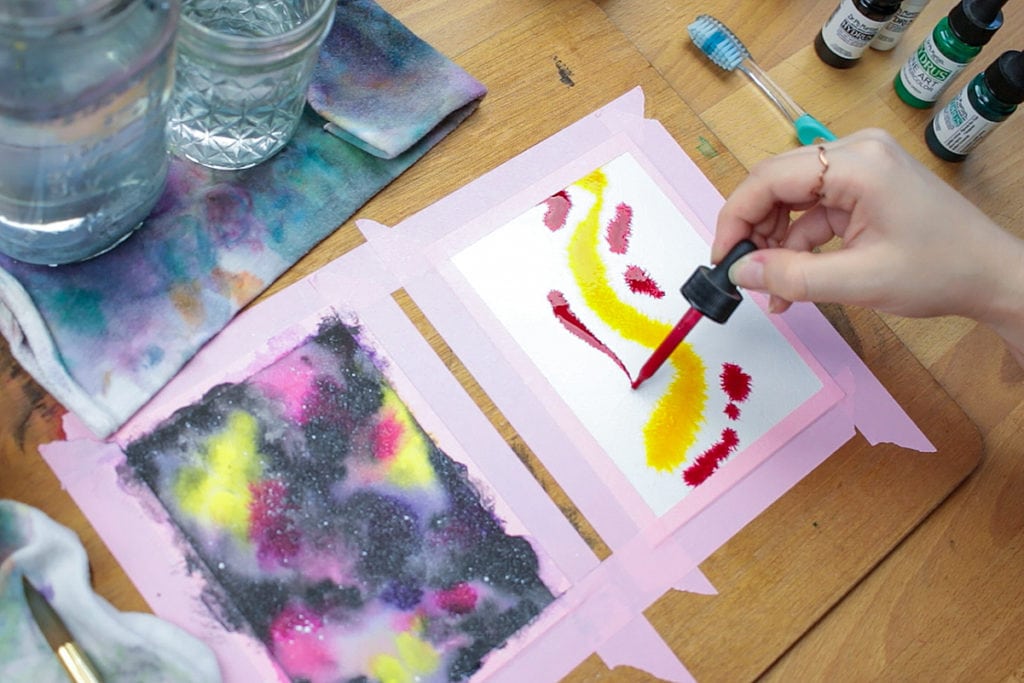
1. Tape Your Watercolor Paper
Cut down your watercolor paper so it’s easier to work with and lay it on your board. Then use masking tape to carefully tape the edges of the paper to the board, covering about 1/4″ of the paper’s edge. Take care to keep the paper as flat as possible. Use your fingernail or the edge of a ruler to press the tape onto the edge of the paper so it gets a nice seal.

2. Wet the Paper
Load your big brush with clean water and apply it to your watercolor paper. You want the paper to be wet, but not so wet that it is dripping.

3. Add Your Colors
While the paper is still wet, grab your lightest pigment and apply it to the paper. I used a sunny yellow and applied it to the middle of my watercolor galaxy. You want to add the lightest color first because it is going to struggle to show through if apply it after darker paints. Once your light colors are down as the first layer, apply your medium colors. In this case, I chose a rose red and placed it next to the yellow. Lastly, add the darkest color to your galaxy. I incorporated a gorgeous ultramarine blue. Make sure you move quickly during this process and apply all your paints while the paper is still wet. You want to use a wet-on-wet technique so the colors bloom and blend into each other smoothly.


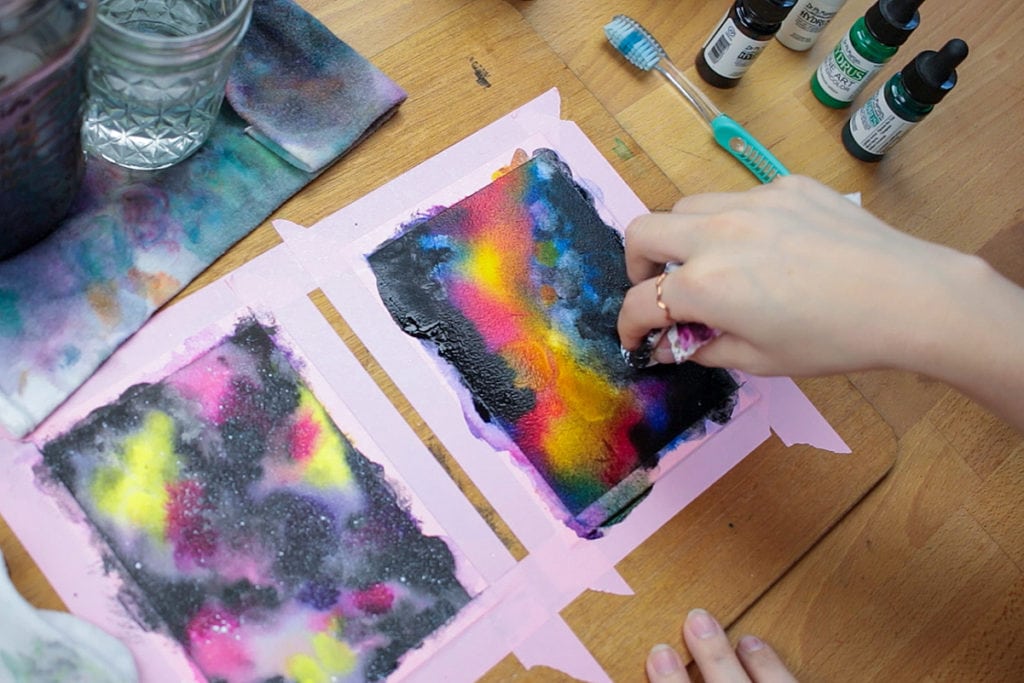
4. Blend and Fill
Once your colors are on the page, take a wet paintbrush and push your paint around until it covers the paper fully. As you work, make sure to keep washing off your paintbrush in one of your jars of water. You definitely need to keep a clean jar and a dirty jar during this process because you can muddy your color combinations fast. Just clean off your brush in the dirty jar, plop it into the clean jar, and go back to your watercolor galaxy if you want to keep the colors true and bold. There’s a lot of color going on and it will get out of hand with just one jar of water, so don’t skip this step!
Blend the layers of colors as much or as little as you like until you create a happy burst of color. Make sure that you continue to keep the paper wet. If you see any spots start to dry, hit it with a wet paintbrush to keep the paint active.

5. Add Black Paint
When you’re happy with the colors in your watercolor galaxy, it’s time to add some black watercolor. Drip in some black paint sparingly along the edges of your galaxy, away from the lightest paint color. If you find you need more black or darker colors later, you can easily add it, so don’t go overboard.

6. Blend in the Black
Take your clean paintbrush and blend the black paint using gentle brushstrokes toward the lightest spots of color. If you find the black is too strong, feel free to wipe your paintbrush on your rag or a paper towel to unload your brushes. Again, make liberal use of your dirty water jar to keep the black paint from tainting your painting water. Black paint is way more concentrated than you think.

7. Dab it Away
As soon as you’re done adding black paint, ball up a clean paper towel and start dabbing away at the black. This will lift the black paint and show the color underneath, creating a lovely cloudy effect. Make sure to keep rotating the paper towel so you don’t start transferring black paint where you don’t want it to go. At this point, it’s up to you to keep tweaking the color composition of your watercolor galaxy. If you want more color, add more color. If you want to adjust the black, add more or dab it away to your heart’s content.
After you are satisfied, it is time to let your watercolor galaxy dry completely. It can take a while since the paper is so wet, so this would be a great time to go do another task for a while. If you’re impatient like me, you can also use a heat tool to dry your painting in just a few minutes. Just be careful to not burn the paper!
8. Scatter Some Stars
Now that your watercolor galaxy, looking like a beautiful night sky, is bone dry, it’s time for the really fun part — adding stars! Grab your white acrylic paint or Bleedproof White (Is it paint? Ink? No one knows!) and your toothbrush. Either dip the tips of your toothbrush bristles in the paint or use a paintbrush to apply the white to the toothbrush. Just don’t dip the whole head of your toothbrush in the paint! You will get more than you bargained for.
Pointing your toothbrush at your paper, drag your thumb firmly across the bristles of the toothbrush to flick a fine mist of white dots onto your watercolor galaxy. Go wild with this step and have fun! The universe isn’t uniform, so don’t worry too much about getting it perfect.
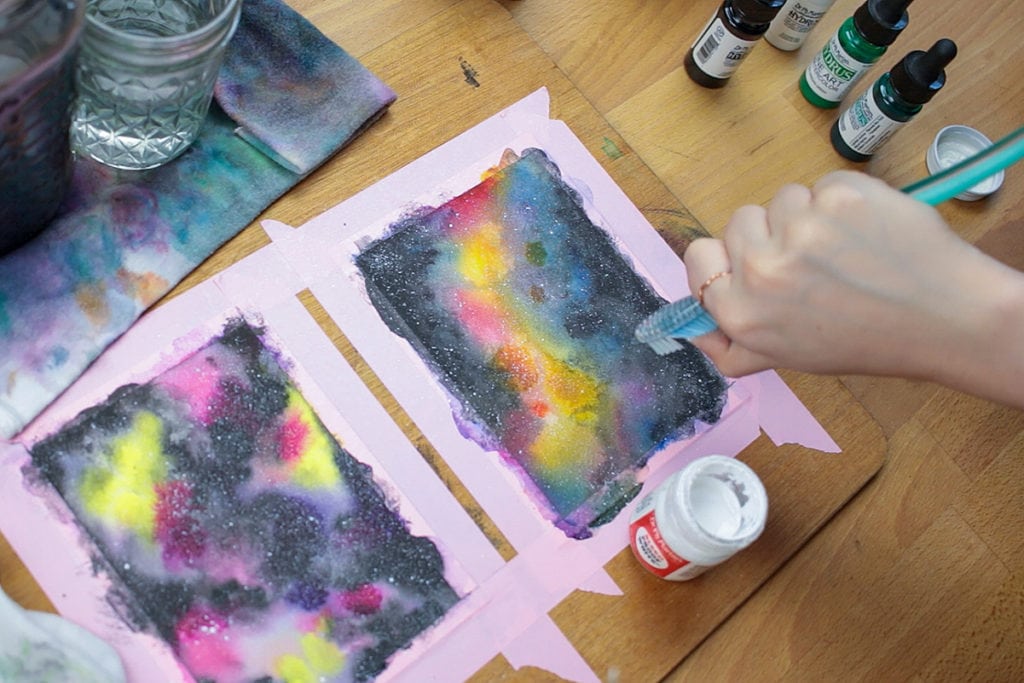
9. Add Details for Extra Oomph
If you’re happy with your watercolor galaxy, then you can absolutely stop and call it a day. However, something that I find adds a lot of kick to your galaxy is the addition of special stars. Grab your smallest brush — for me, a no 0 round brush — and carefully add a handful of stars to your galaxy. This doesn’t take long, but it can really bring your galaxy up a notch!

10. Finish Up
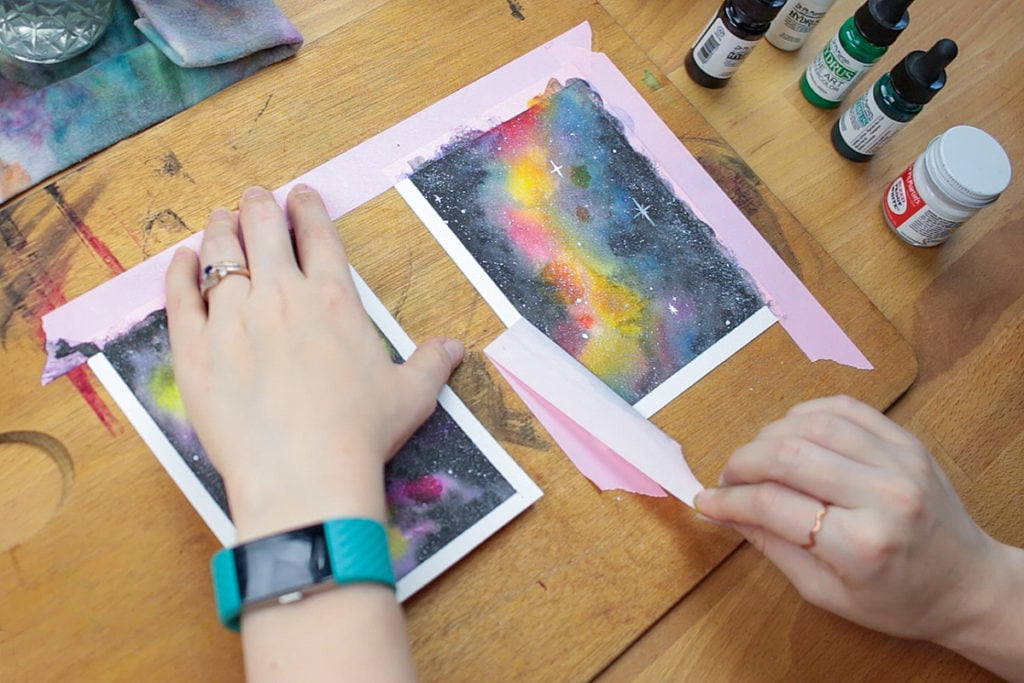
Your watercolor galaxy is finally done! All you gotta do now is let it completely dry and remove the masking tape. Make sure you remove it at a sharp angle and at a nice slow pace so you don’t accidentally rip the paper underneath. You should be left with crisp lines and clean edges, which complement a vibrant watercolor galaxy beautifully.
Up Your Space Game
Now you know how to create a stunning watercolor galaxy from scratch. And you can see that it’s really not that hard! Just keep a few paper towels on hand and make sure your paint stays wet and you are golden. Once you’ve got a few galaxies under your belt, you can use your new space skills to create artwork for your bullet journal cover, phone wallpaper, or beautiful lettered art. Much like actual outer space, the possibilities are endless!
Ready to jump in a make your own watercolor galaxy? Make sure to share it and tag me on Facebook (@littlecoffeefox) or Instagram (@little_coffee_fox) so I can see! I want to see what beautiful artwork you create with your new galaxy greatness. Now off you go to make something amazing!
Explore More Art Tutorials
If you enjoyed this colorful painting technique, then you’d definitely love my course Painting Watercolor Galaxies: How to Create Epic Celestial Scenes on Foxsy!
Painting Watercolor Galaxies is a fantastic class to help you figure out the finer points and details of this gorgeous process and turn it into one of your favorite techniques. You’ll follow along with several different flavors of galaxies and learn how to turn them into stunning finished pieces of art.
And with a Foxsy membership, you also gain access to the growing creative course library! Foxsy is packed with art classes to help you grow your watercolor painting, lettering, drawing, and creative journaling skills with professional video tutorials and live demonstrations.
Take the next step on your creative journey and get your Foxsy membership today!


Fabulous, Shelby!I loved watching this!